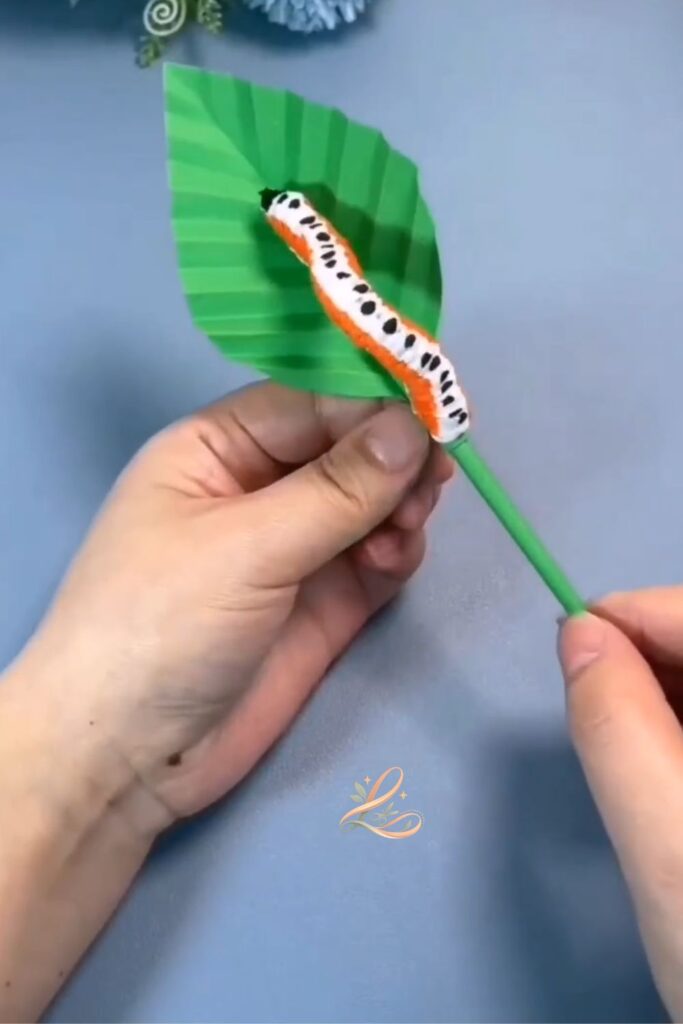
Picture a plump little caterpillar resting on a beautifully textured green leaf, its white body decorated with a green stripe and cheerful black dots. It sits on a green stem, looking like something from a boutique gift shop. And you made it yourself, from a piece of paper and a wooden skewer.
You do not need any experience to make this. You do not need any special tools. By the end of this post, you will have a full video tutorial, step-by-step written instructions, and every tip you need to make your own adorable paper caterpillar — even if you have never crafted before in your life.
You will need one sheet of green cardstock or paper, a strip of white paper, a wooden skewer, white craft glue, a green marker, and a black marker. The whole project takes around 15–20 minutes from start to finish.
Why You Will Love This Project
This paper caterpillar craft is one of those rare projects that looks complicated but comes together with a few folds and a few pen strokes. It costs less than $2 to make and looks like something that belongs in a cute garden boutique. Whether you want a sweet piece of nature-themed home decor, a handmade gift, or a fun activity to do with little ones, this project delivers every single time. And because the full video is right here in this post, you can pause, rewind, and follow along at your own pace.
What You Will Need
- Green cardstock or green construction paper — [or use a sheet of green printer paper, though cardstock holds its shape better]
- Wooden skewer or thin wooden chopstick — [or use a thick drinking straw painted green]
- Strip of white paper, approximately 1.5 cm wide and 20 cm long — [or cut a strip from any white sheet of paper]
- White craft glue or school glue — [or use a glue stick]
- Green marker — [or use green paint and a thin brush]
- Black marker — [or use a black pen or black paint with a fine brush]
Total estimated cost: $1–$3
All materials can be found at your local craft store or ordered online.
Video Tutorial
Watch the full tutorial above before reading the written steps. The written steps below match the video exactly so you can follow along at your own pace.
Step-by-Step Instructions
Step 1: Gather Your Materials and See the Finished Craft
Before you start folding, take a moment to look at what you are aiming to make. The finished craft is a little caterpillar sitting on top of a textured green paper leaf, attached to a green stem. There are two colour variations in the video — one with an orange-toned body and one with a green-striped body. We will be making the green-striped version, which is the one shown in the step-by-step portion of the video. It is okay if yours looks slightly different — every handmade piece has its own charm.
Pro Tip: Lay all your materials out in front of you before you begin. Having everything within reach makes the process feel much calmer.
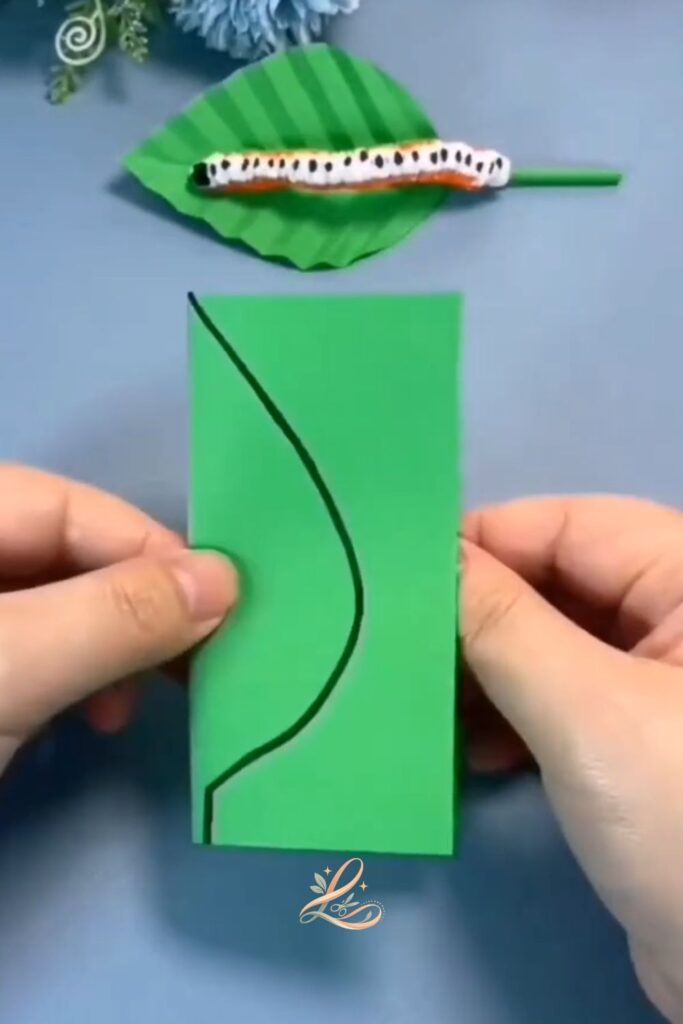
Step 2: Fold Your Green Paper Into a Leaf Shape
Take your green piece of paper and hold it in both hands with the short edges to your left and right. Bring the two short edges together and fold the paper in half, creasing it firmly down the centre. Now take the folded paper and bring the top corner diagonally down toward the bottom centre point, so the paper forms a pointed triangle shape. You should have a tall, triangular form with a fold running down the middle — this is the beginning of your leaf.
Pro Tip: Run your fingernail firmly along every fold to get a crisp, clean crease. Take your time with this — a sharp crease makes every step that follows much easier.
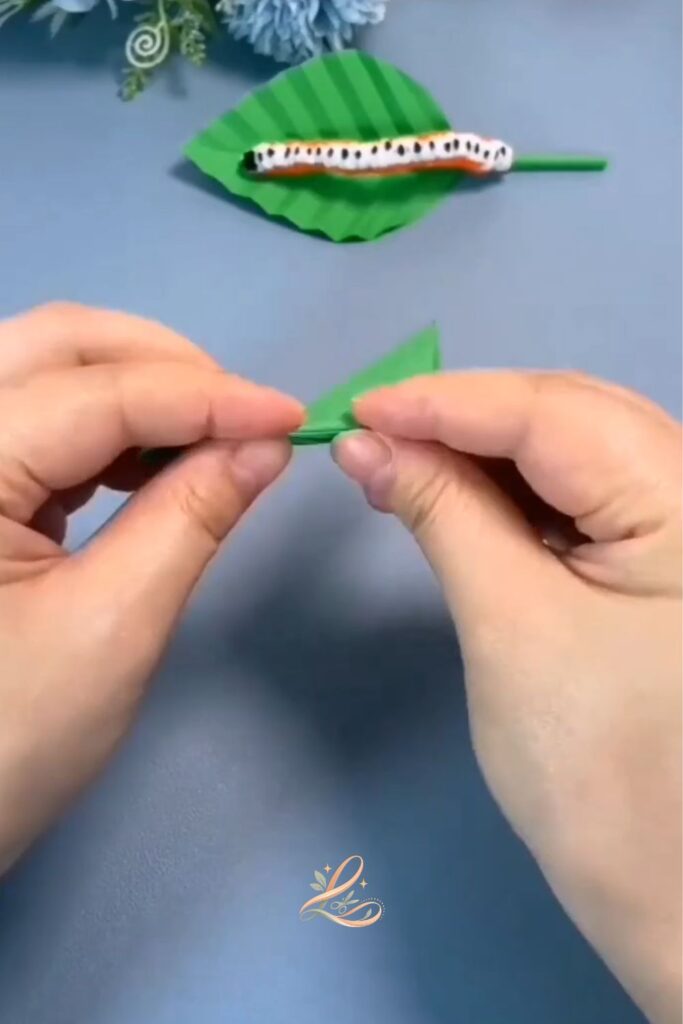
Step 3: Shape the Bottom of the Leaf Into a Stem Point
Take the bottom of your folded paper — the open edge — and fold it upward. You are creating a small pointed base at the bottom of your leaf shape. This pointed base will become the area where your stem attaches later. Crease this fold firmly. At this stage, your paper should look like a wide leaf with a pointed bottom tip.
Pro Tip: The fold at the bottom does not need to be a specific size. No rush — aim for around one centimetre, but it is okay if it is not perfect. The result will still look wonderful.

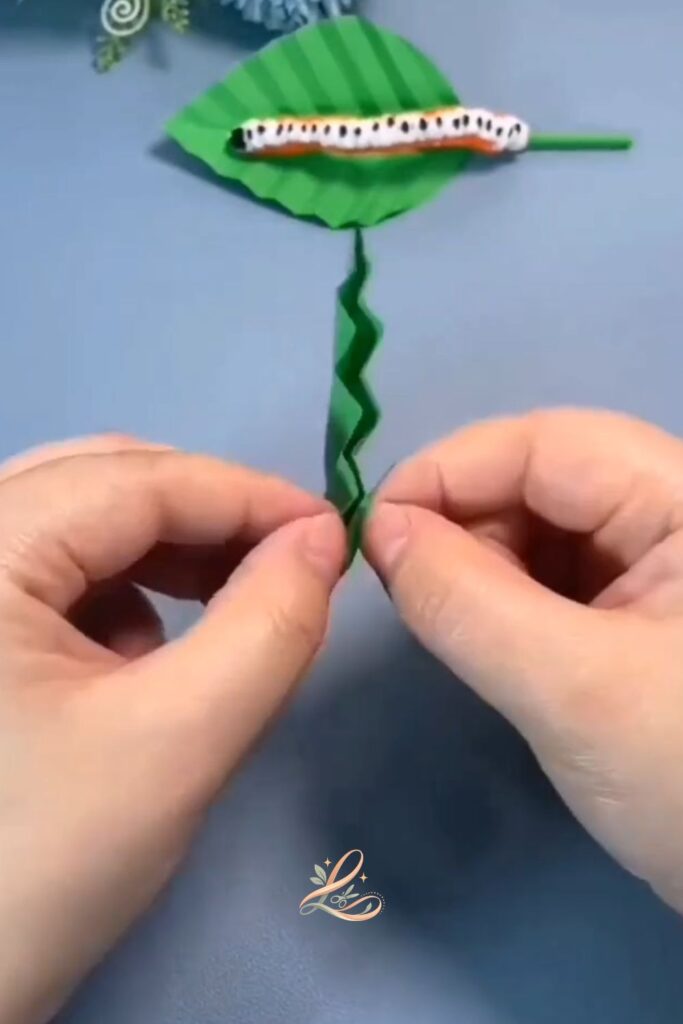
Step 4: Gather and Pinch the Stem
Hold the pointed bottom section of your folded leaf between your fingertips and begin pinching it together. Squeeze and twist gently, gathering the paper so it forms a narrow, twisted stem at the base. Work your way around the base, bunching the paper inward. The more you gather and compress, the thinner and more stem-like it becomes. Your leaf shape will hold its form at the top while the base narrows into a thin, twisted paper stick.
Pro Tip: Think of this step like gathering a ponytail — you are not tearing the paper, you are simply compressing it. Go slowly and the paper will cooperate.
Step 5: Fan Out the Leaf Into a Textured Shape
Hold your gathered stem in one hand and use the other hand to gently fan open the top leaf portion. Push and pull the paper layers apart so they spread out into a wide, layered, accordion-style leaf. You will see the beautiful ridged texture appear — this is what gives the leaf its realistic, dimensional look. Press the fanned layers gently so they stay open and fanned. Your leaf should now look full and three-dimensional with the stem at the bottom.
Pro Tip: Do not worry if the layers are not perfectly even. Uneven fanning actually looks more natural — real leaves are never perfectly uniform.
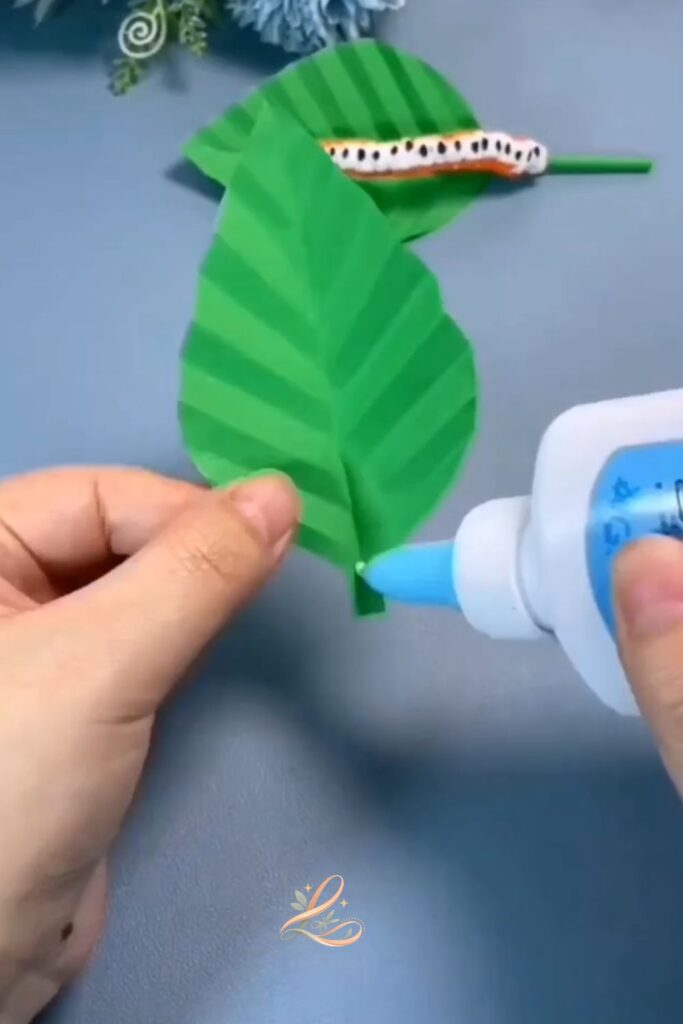
Step 6: Attach the Paper Leaf to the Wooden Skewer
Take your wooden skewer and push the pointed end up through the centre of your paper stem from the bottom. Thread the skewer through until around one centimetre of the tip pokes through the top of the gathered stem and into the base of the leaf. The stem should grip the skewer snugly. If it feels loose, add a small drop of glue to hold it in place. At this stage you should have a leaf sitting on top of a wooden stick — it already looks like a little garden decoration.
Pro Tip: Push the skewer through slowly and steadily. If the paper tears slightly at the base, a dot of glue will fix it completely. It is okay if it is not perfect.
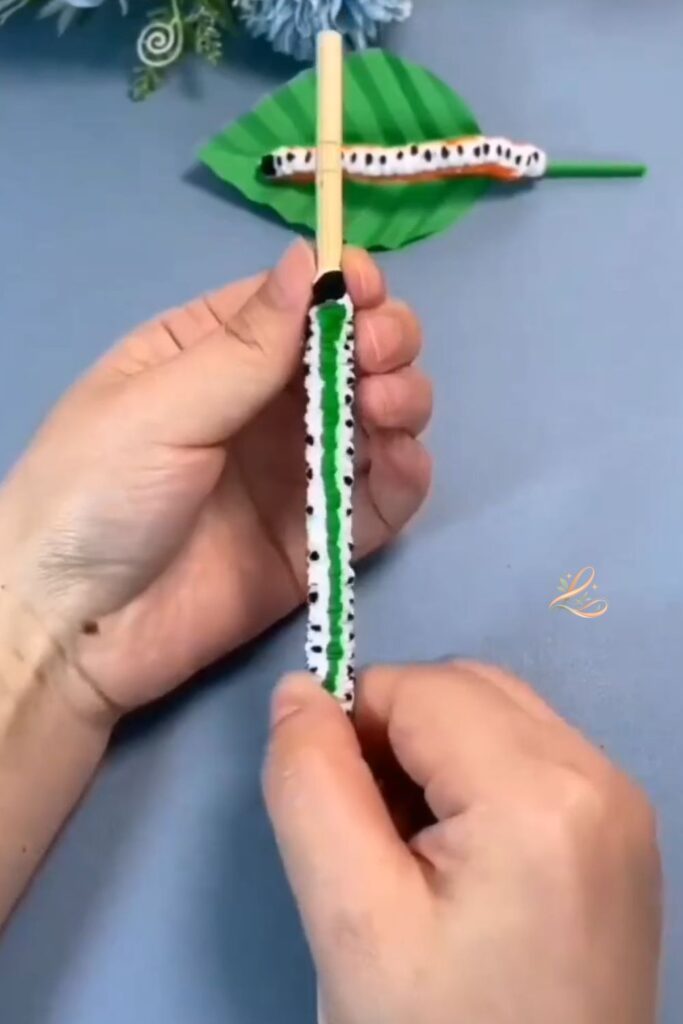
Step 7: Wrap the White Paper Strip Around the Skewer
Take your strip of white paper and apply a thin line of glue along the length of it. Starting from the top of the skewer — just below where the leaf sits — press the end of the white strip against the skewer and begin wrapping it downward in a tight spiral. Keep the layers snug against each other as you wrap. Continue wrapping for about 5–8 centimetres, which will form the body of your caterpillar. Press the end down firmly and let the glue grip.
Pro Tip: If your paper strip shifts while you wrap, hold it in place for a few seconds before continuing. The glue needs just a moment to start gripping. No rush.
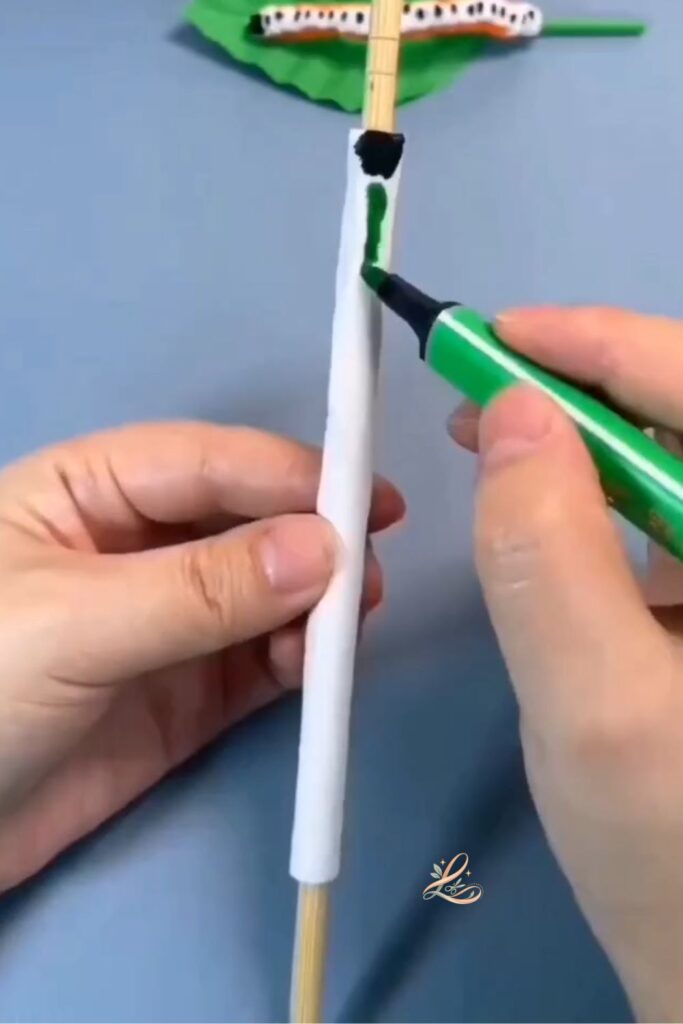
Step 8: Draw the Green Stripe Down the Caterpillar Body
Take your green marker and draw a single stripe running along the length of the white wrapped section. Start from the very top of the white wrap (near the leaf) and draw the line straight down to the bottom. This stripe gives your caterpillar its characteristic green colouring and adds dimension to the otherwise flat white surface. You can make it a thin stripe or a wider band — either way looks charming.
Pro Tip: Draw the stripe in one confident stroke if you can. If your line wobbles, that is completely fine — caterpillars are naturally bumpy and imperfect, so a little wobble only adds character.
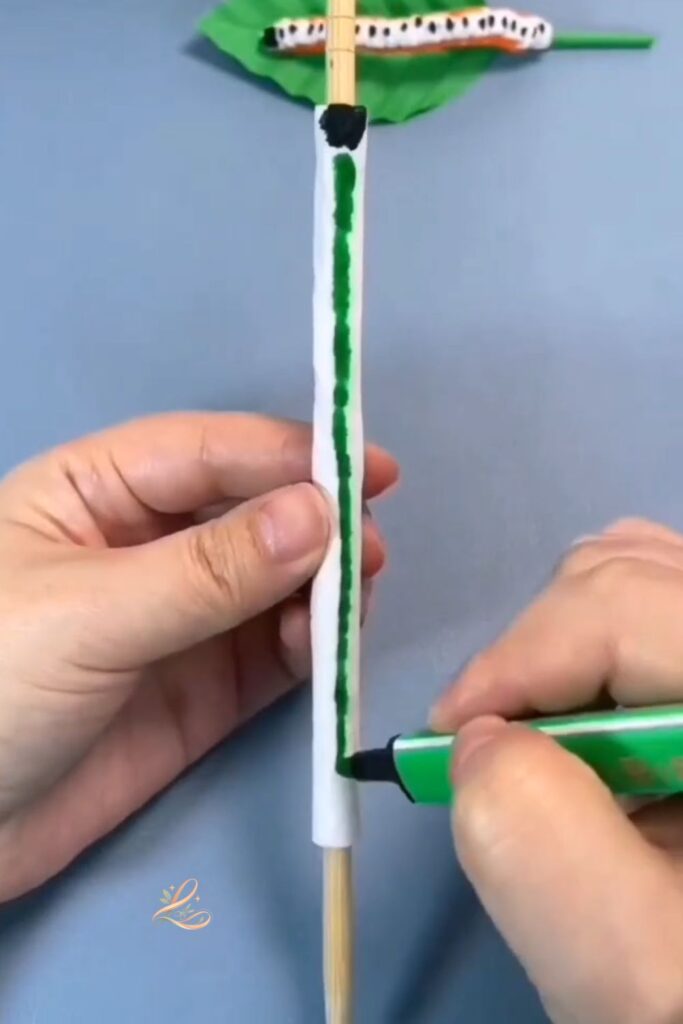
Step 9: Add the Black Dots and Head
Pick up your black marker and draw a solid black circle at the very top of the white wrap — this is your caterpillar’s head. Then, working your way down the body, add small oval or round black dots on both sides of the green stripe. Space the dots roughly evenly apart, alternating slightly left and right as you go. Continue until you reach the bottom of the wrapped section. When you are done, your caterpillar will have a polka-dotted pattern running its entire length.
Pro Tip: There is no exact number of dots required. Work slowly and let each dot dry for a second before moving to the next. If a dot is too big or in the wrong spot, it is okay — a thick black marker dot drawn next to it will blend in naturally.
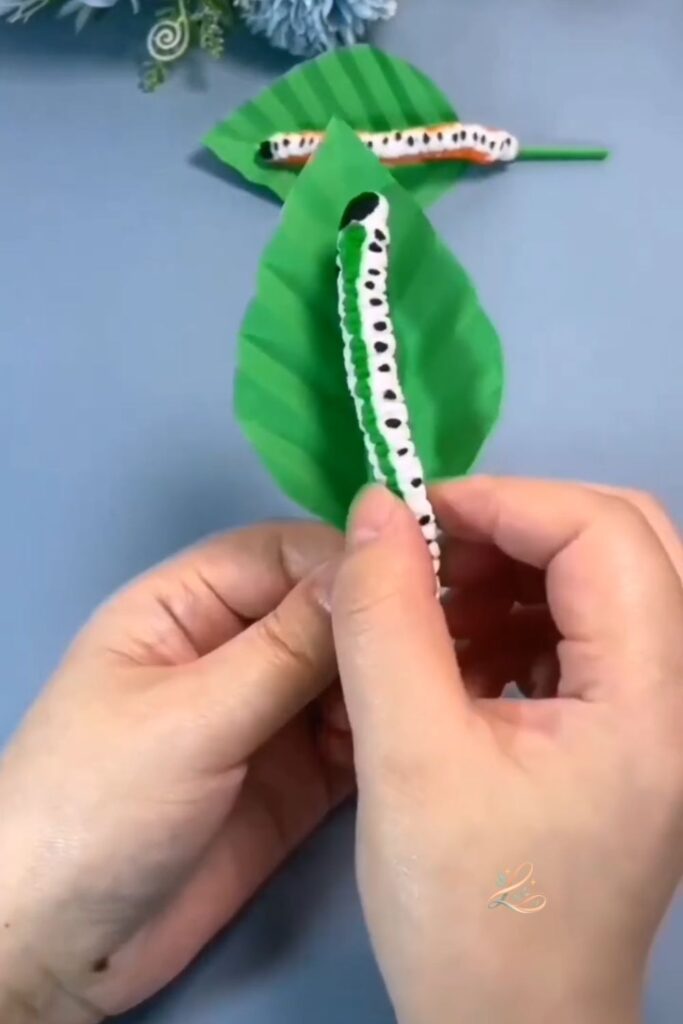
Step 10: Glue the Leaf and Reveal Your Finished Caterpillar
Apply a small amount of glue to the underside of your paper leaf and press the caterpillar body gently onto the surface of the leaf. Position the caterpillar so it sits diagonally across the leaf, with the head end slightly raised — just as a real caterpillar would rest. Hold it in place for a few seconds. Take a step back and look at what you have created: a beautifully textured green leaf with a cute spotted caterpillar resting right on top of it, all on a tidy green stem. You did it!
Pro Tip: If you want your caterpillar to stay on the leaf long-term, let it dry fully — around 5 minutes — before handling. Laying it flat while it dries helps the glue set evenly.
Tips & Tricks
Use cardstock rather than regular printer paper for the leaf if you can. Cardstock holds the fanned shape better and gives a more satisfying texture when you spread the layers. If all you have is printer paper, it will still work — the leaf will just be slightly more delicate.
If your caterpillar dots smear, let the green marker fully dry first before picking up the black marker. Even waiting 30 seconds makes a big difference. Markers dry faster than you might expect, and patience here saves you a lot of frustration.
If the white paper strip unravels after wrapping, add a second dot of glue to the inside of the bottom end and pinch it firmly. Hold for ten seconds. Craft glue grips fast once it has pressure applied to it, so this fix takes almost no time at all.
To store or display your caterpillar, stand it upright in a small jar or vase of sand, pebbles, or decorative filler. This gives it height and makes it look like a proper garden decoration. A cluster of three or four in different sizes looks incredible on a windowsill or shelf.
You can make this craft in any colour. Try orange and black dots for an autumn caterpillar, red and white for a festive version, or yellow and purple for a totally whimsical look. The technique is exactly the same — only the marker colours change.
Ways to Use This Craft
As home decor, your paper caterpillar looks beautiful standing in a small vase or glass jar on a bookshelf, windowsill, or bedside table. It suits cottagecore, botanical, and nature-inspired interiors particularly well. Group several together at varying heights for a whimsical display that costs almost nothing.
As a gift, this little caterpillar is a genuinely thoughtful handmade present. It is perfect for children, teachers, grandparents, or anyone who loves nature and garden themes. Wrap it in a small clear gift bag with a ribbon and it looks like something from a craft market. It also works beautifully as a gift topper placed on top of a wrapped birthday or thank-you gift.
As garden or outdoor decor, you can stick the skewer directly into a pot plant or a small patch of earth outside. Surrounded by real greenery, it looks playful and charming. For outdoor use, consider applying a thin coat of PVA glue over the entire finished craft to give it a little weather resistance.
For seasonal variations, try making a cluster of caterpillars in orange, yellow, and brown for an autumn nature table display. For spring, use soft pastels. For Christmas, try red and white with a tiny bow added to the head.
Frequently Asked Questions
Q: How long does it take to make a paper caterpillar on a leaf?
A: Most people finish this project in 15 to 20 minutes, including the time to let the glue dry. If you are making several at once, each one gets faster once you have the folding technique down. It is a perfect project for a quiet afternoon or a quick creative break.
Q: What if I make a mistake — can I fix it?
A: Absolutely. If your fold goes wrong, simply unfold and try again — paper is very forgiving. If a dot is in the wrong spot, draw a slightly larger dot next to it and it blends right in. If your leaf tears at the stem, a small piece of tape on the inside holds everything together perfectly. There is no mistake here that cannot be fixed.
Q: Where can I buy the materials for this craft?
A: All of these materials are available at any craft store such as Michaels, Hobbycraft, or Daiso. You can also find them easily on Amazon or at a dollar store. Green cardstock, wooden skewers, and markers are all very budget-friendly items that most households already have on hand.
Q: Does the caterpillar body have to be white, or can I use coloured paper?
A: You can use any colour of paper for the body. The tutorial uses white because it shows the green stripe and black dots most clearly, but light yellow, pale pink, or light blue would all work beautifully. Dark colours will make it harder to see the marker details, so stick to lighter shades if you want the dots to stand out.
You Made Something Beautiful Today
Take a look at your finished paper caterpillar and give yourself a proper moment to appreciate it. You folded, gathered, wrapped, and decorated — and the result is something genuinely lovely. That is something to be proud of.
Share your creation with us — we would love to see it! Tag us on Pinterest or drop your photo in the comments below.
Ready for your next project? Try Easy Paper Envelope Craft next!
Happy crafting! — LOUVADECORES